


DIY Tips for Cleaning Leather Seats Without Damaging Them
June 8, 2026
Key Highlights:
● Leather car seats require gentle cleaning to maintain both appearance and longevity.
● Household items like mild soap and microfiber cloths can safely clean most stains.
● Avoid harsh chemicals or excessive water that can dry out or crack leather.
● Conditioning leather regularly prevents fading and stiffening over time.
● Simple DIY methods can save money while keeping your car interior family-ready.
Estimated Reading Time: 8 minutes┃Post by: Riley Hawthorne
Why Leather Needs Special Care?
Most automotive leather is covered with a thin polyurethane or similar protective coating that sits on top of the actual hide. This coating is what you actually touch and see. It gives the seat its uniform color, resistance to stains, and smooth texture. However, while this layer improves durability, it also means contaminants such as sweat, sunscreen, and dust tend to accumulate on the surface rather than being absorbed away. When left untreated, these residues begin to break down the coating through friction and chemical exposure during everyday use.
For efficiency and consistency, the natural hide is treated, dyed, and sealed so that it can withstand years of use without rapid deterioration during production. This process removes many of the natural oils that would normally keep leather soft in its raw state. As a result, the finished material relies heavily on its protective top layer and periodic maintenance to prevent dryness and surface fatigue.
Daily family use accelerates this wear pattern. Children climbing in and out of seats, food spills in creases, and constant seatbelt movement all create micro-abrasions in the coating. Even small particles like crumbs or sand act like fine abrasives when pressed into the surface repeatedly. Over time, this leads to dull patches, uneven shine, and early signs of cracking in high-contact areas such as seat bolsters and entry points.
Parked vehicles, especially in warm climates or during summer months, experience interior heat buildup that dries out the surface layer. UV radiation gradually weakens the coating, making it less flexible and more prone to visible wear. Without protection, this process accelerates fading and reduces the leather’s ability to remain supple.
Realistic Wear Timeline (Family Vehicle Example)
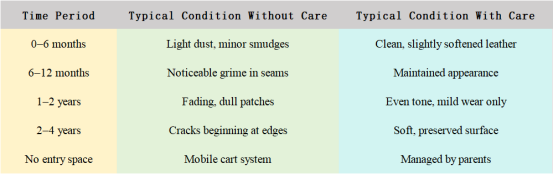
Because of these combined factors—surface coating behavior, manufacturing structure, daily friction, and environmental exposure—leather seats cannot simply be wiped occasionally and ignored. They require a consistent cycle of gentle cleaning to remove contaminants and periodic conditioning to support flexibility and reduce long-term surface stress. When this routine is maintained, leather interiors can remain visually clean and structurally sound for many years, even in high-use family vehicles.
Understanding Leather Types
Before starting, it’s important to identify the type of leather in your car. Most vehicles have either aniline, semi-aniline, or pigmented leather. Each reacts differently to cleaning products. Here’s a quick reference:
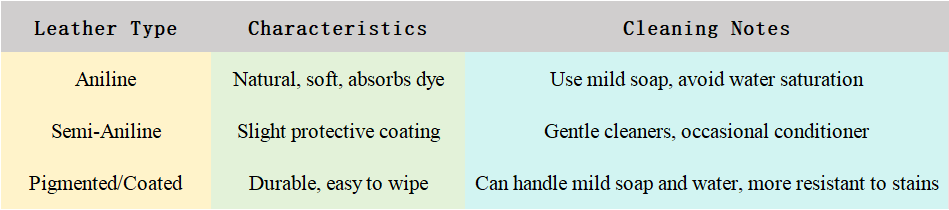
Knowing the type of leather prevents irreversible damage during cleaning.
Step 1: Gather Your Tools
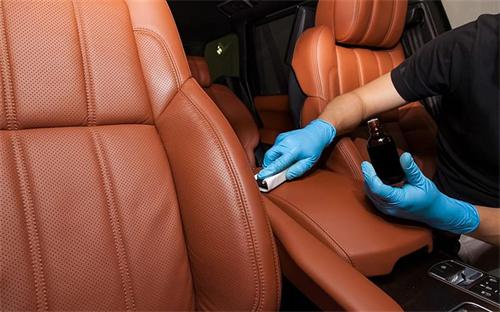
The right tools make the process safer and faster. For effective cleaning, you will need:
● Microfiber cloths (2–3 pieces)
● Soft-bristled brush or old toothbrush
● Mild liquid soap or leather-specific cleaner
● Distilled water
● Leather conditioner
Avoid sponges or rough fabrics, which can scratch leather surfaces.
Tools to Avoid
● Bleach or ammonia cleaners
● Alcohol wipes (unless spot testing first)
● Rough sponges or paper towels
● Household degreasers
Step 2: Remove Loose Debris
Before any moisture is introduced, dry debris must be eliminated. In real-world use, this step often takes longer than expected due to hidden debris.
Focus areas include:
● Seat stitching seams
● Under child car seats
● Between seat cushions
● Seatbelt buckle zones
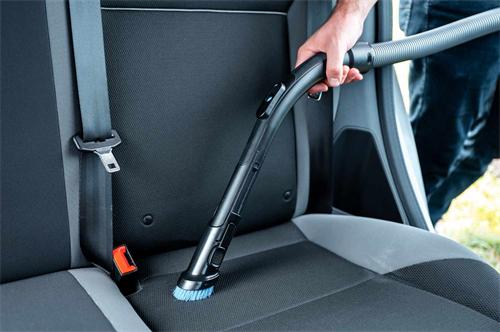
A vacuum with a soft brush prevents micro-scratching caused by grit particles. Begin by:
1. Vacuuming seats using a soft brush attachment.
2. Gently brushing crumbs out of seams with a soft-bristled brush.
Pro Tip: A small handheld vacuum can reach the tricky nooks between seat cushions.
Step 3: Clean the Leather
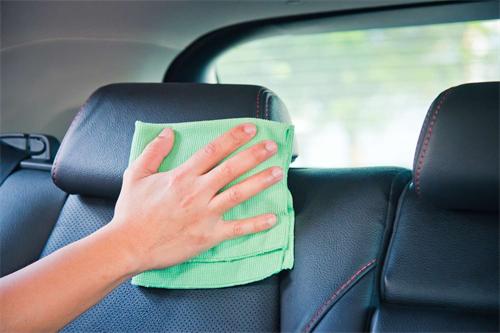
Prepare a cleaning solution by mixing 2 drops of mild soap with 1 cup of distilled water. Dampen a microfiber cloth (not soaking wet) and wipe down the seats in sections.
● For stubborn stains, use a soft brush to lightly agitate the area.
● Wipe excess moisture immediately with a dry cloth.
Always test the solution on a hidden area first to ensure there’s no discoloration. Instead of spraying directly onto leather, always apply the solution to a microfiber cloth. Work in small 30 cm x 30 cm sections:
Gently wipe in circular motions
Apply light pressure only
Avoid soaking seams or perforations
Step 4: Addressing Stubborn Stains
Different stains require different approaches:
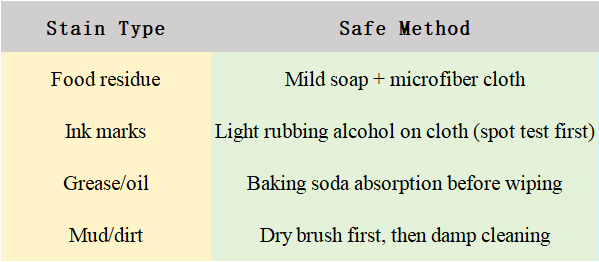
Avoid aggressive scrubbing—leather damage is often permanent once the surface layer is abraded.
Step 5: Dry and Condition
After cleaning:
1. Allow leather to air dry naturally, away from direct sunlight.
2. Apply a thin layer of leather conditioner using a clean microfiber cloth.
3. Buff gently to restore shine and softness.
Conditioning prevents cracking and keeps leather flexible—particularly important in climates with extreme temperatures.
Maintain Regularly
Consistency matters. Create a schedule based on your family’s usage:
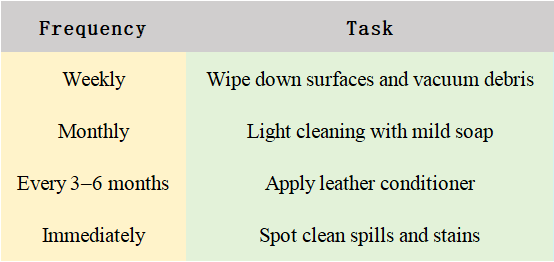
Frequent, small maintenance sessions prevent the need for harsh deep cleaning.
Common DIY Mistakes to Avoid
● Excess Water: Saturating leather can cause warping or mildew.
● Harsh Chemicals: Ammonia or bleach-based cleaners strip oils and damage finish.
● Ignoring Conditioners: Dry leather cracks faster than maintained leather.
Sample Cost Comparison
Investing in DIY care can save money over professional services.

Over 5 years, DIY maintenance can save $625–$1,300, depending on frequency.
(This article is for informational purposes only. Results may vary based on leather type, product quality, and usage. Always follow manufacturer instructions for your vehicle’s interior.)
FAQs
1. Can I use baby wipes on leather seats?
Yes, but choose alcohol-free and fragrance-free wipes. They are safe for light cleaning but shouldn’t replace conditioning.
2. What should I do if a spill soaks into the seams?
Blot immediately with a dry cloth. Use a soft brush to lift debris and apply a small amount of mild soap solution to the affected area.
3. How often should leather be conditioned?
Typically, every 3–6 months. Homes in hot or dry climates may benefit from more frequent conditioning.
About Author
Riley Hawthorne is a parenting lifestyle writer with over 10 years of experience combining family life with practical home and vehicle care. Riley specializes in realistic, budget-conscious tips for busy parents who want to maintain quality and comfort in their daily routines.
Keep exploring our blog for more family-friendly tips that protect your home, car, and sanity.
Recommended for you: